
Happy Sunday friends! We’ve been a bit absent on the internet lately but we have a few good reasons.
The first (and biggest) is that Levi has been going through some work changes lately. When we moved out to Illinois to work on the bus full time, we knew that my paycheck would only really be enough to cover our current bills. That meant that Levi couldn’t work on the bus all the time: he’d need to get a part-time job.

So after a few weeks of looking, he wound up getting a job at a local machine shop in early June. While he liked this job, it was pretty labor intensive. And, because his shift was 4 a.m.-2:30 p.m., he had to work on the bus in the afternoon, when the sun and humidity was at its highest. Not to mention that he was working 50-60 hours a week. Then, a few weeks after starting that job, he got a callback from a luxury kitchen/bathroom design company asking if he wanted to interview for a remote tech support position. After enthusiastically saying yes, he went through a rigorous interview process that lasted about five weeks.
I’m happy to report that they offered him the job! He starts in mid-August and had his last day at the machine shop this past Friday. His new job is online and the shifts are much more manageable. AND his PST hours means he’ll get several hours early in the morning to work on Bustav before it gets too hot outside.
All this to say, we’re sorry we’ve been gone but we promise we’ll be here more often in the future!
Though, while we weren’t posting about the bus online, we were getting quite a large amount of work done. Over the last two months, we’ve managed to remove the windows, raise the roof and reskin the entire bus! Below, I’m gonna share some videos and behind the scenes of the first two projects, with footage of the reskinning to come very soon.
Back at the end of May, we removed all the windows and set them aside for later. We went back and forth on whether we actually wanted to keep the bus windows or replace them with RV windows instead. The bus windows aren’t double paned, so they aren’t super well insulated. And because our biggest goal is to save as much energy and power as possible, replacing the windows with double paned and well sealed RV windows seemed like the best option. But, as expected, RV windows are super expensive! Who would have thought? We would have been paying anywhere from $200-500 a window! So, after seriously considering whether or not it was worth the price, we decided to refurbish the bus windows and try to make them the best they can be.
Though I was a little bummed to not be able to replace the small school bus windows with massive RV ones, I was super excited to be able to keep the emergency windows! If you’ve never opened a bus emergency window (like me before I actually purchased a school bus) they swing open like a door–perfect for cool days and for passing things back and forth through the windows (i.e. the compost toilet).
Anyway, the first step to the roof raise was removing those windows and then taking off the panels on the outside of the hatchannels (the metal ribs of the bus) and the rub rails. Then, Levi had to cut and pop out each and every rivet that was connecting the skin and the framing so he could eventually put new skin on. He would like me to note that there were SO MANY RIVETS.

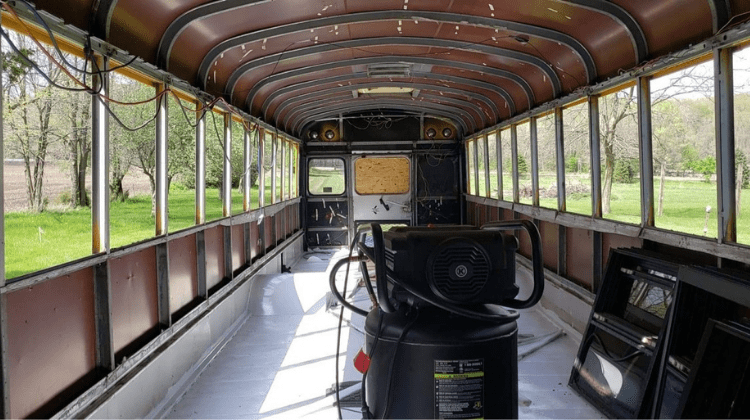
Finally, we could do the fun part. Raising the roof. First, Levi welded in the supports that assisted with moving the roof up. It’s hard to explain exactly how the roof raise works, so I recommend watching the videos for a bit of a closer look, but basically Levi used the help of welded in supports, an allthread rod, a few bolts, a jack and a piece of wood to slowly, but surely, raise the roof 14 inches.
I wasn’t there, but from the footage Levi provided me with later, it feels a little like magic, I mean come on:


The roof might as well be floating! To secure it, Levi welded in new rib “extension” pieces and eventually used a grinder to remove those temporary supports and VOILA–the roof raise was half done!
Since this project was completed, we’ve been able to get everything reskinned and the roof looks whole again (footage and blog post to come later) and I can’t believe it’s done! Back when we first purchased the bus, the roof raise seemed like the most daunting part. I mean, cutting a school bus in half, jacking up the roof, lifting it 14 inches in the air and floating it there? Preposterous! But we actually did it! And the whole process is behind us.
I know some of you have come to this blog post to either A.) learn how to raise the roof on a bus or B.) want to know if you should raise the roof of your bus and I’m afraid I don’t have the answers for you. We don’t have a great tutorial and since we haven’t actually lived on the bus yet, I can’t tell you if it was worth it. It was pretty pricy, it required some pretty intense building skills, but so far, we are very, very pleased with it.


Wow! That is a huge amount of what looks like difficult work…and it does look like magic to see the roof “floating.” Great work, Levi!! Good luck with your new job too.
LikeLike